LeftyBassist.com

The online home for southpaw bassists.
It is currently April 19th, 2024, 4:13 pm


Post new topic Reply to topic  [ 4 posts ] 
Author Message
 Post subject: Epoxy finish on a Rosewood fingerboard - how I do it
PostPosted: November 13th, 2010, 12:28 pm 
Offline
User avatar

Joined: March 10th, 2008, 7:00 pm
Posts: 1184
Location: Seattle, WA USA
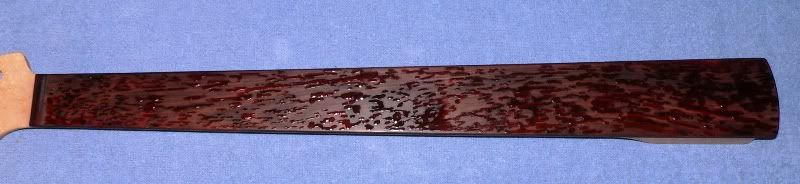
I've finished numerous Maple fingerboards with epoxy, but this job is my first time working a Rosewood fingerboard. To add a little pressure, this isn't just any Rosewood fingerboard - it's a significantly old slab of Brazilian Rosewood :shock:

Since the focus of this thread is about finish the fingerboard, I'm going to write this workflow from the perspective of what most of you would be doing - purchasing a finished neck with an unfinished Rosewood fingerboard.

The first major step is to level the fingerboard to eliminate any minor unevenness. I do this by mounting the neck into a hold down jig that supports the back side and allows me to ensure it's level the entire length of the fingerboard. a 24" machined straight edge assists me in dialing in the adjustment screws so that the centerline of the neck is level. Once this is set I use a machined radius block with 300 grit sandpaper to detail the fingerboard

Image

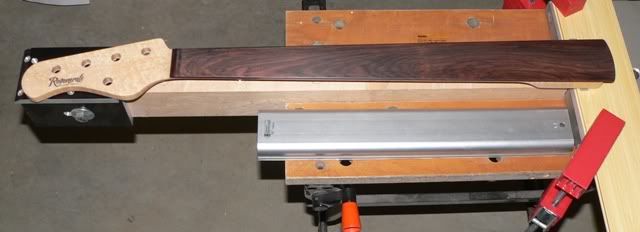
Once this is good I blow out the pores with air and ensure that all of the sanding dust is gone from the pores, then I'll wipe it down with acetone for a final cleaning in prep for the next step

all the best,

R

_________________
Moderator: Blueprinting and Bondo
Pickups: Honey Badger Pickups - Like Honey Badger Pickups on Facebook!
Basses: Regenerate Guitar Works - Like Regenerate Guitar Works on Facebook!


Top
 Profile  
Reply with quote  
 Post subject: Re: Epoxy finish on a Rosewood fingerboard - how I do it
PostPosted: November 13th, 2010, 12:39 pm 
Offline
User avatar

Joined: March 10th, 2008, 7:00 pm
Posts: 1184
Location: Seattle, WA USA
The second step is to fill all the open pores in the Rosewood so that they don't provide opportunity for air bubbles to appear when applying the first layer of epoxy.

I like to use a thin viscosity CA glue for the first fill so that it will creep down into the wood pores and seal all the open capillaries. Getting a good amount of CA into the pore without causing a pool that will run off the fingerboard edge can be tricky if you haven't done this before, so practice on scrap wood prior to attempting this on your actual neck. The first pass on this neck took me about 20 minutes to get all the pores soaking. Here's a peek at just how many pore lines needed filling

Image

I'll let this set for the afternoon and then touch-up any pore lines that look like they aren't over filled with hardened glue. This step may need to be repeated a few times until all the pores are filled. Once the last filling is completed, I'll let the neck sit for a couple days to ensure that all the glue has fully cured before I set the neck back into the hold-down jig and re-level to remove the excess glue

The next step will be applying the first coat of epoxy...

all the best,

R

_________________
Moderator: Blueprinting and Bondo
Pickups: Honey Badger Pickups - Like Honey Badger Pickups on Facebook!
Basses: Regenerate Guitar Works - Like Regenerate Guitar Works on Facebook!


Top
 Profile  
Reply with quote  
 Post subject: Re: Epoxy finish on a Rosewood fingerboard - how I do it
PostPosted: November 13th, 2010, 6:11 pm 
Offline

Joined: March 28th, 2010, 5:47 pm
Posts: 58
Location: Lehigh Valley, PA
Really good stuff!!!! Thanks for taking the time and effort to educate us on the finer points of finishing/refinishing. It sure beats the trial and ERROR method that most of us have used when attempting these types of upgrades or repairs. Many thanks!!!


Top
 Profile  
Reply with quote  
 Post subject: Re: Epoxy finish on a Rosewood fingerboard - how I do it
PostPosted: November 19th, 2010, 5:07 pm 
Offline
User avatar

Joined: March 10th, 2008, 7:00 pm
Posts: 1184
Location: Seattle, WA USA
Image

the first round of pore filling took several applications of thin CA over the course of a couple days. after several additional days of letting the filler cure to be certain it was fully cured down deep in the pores, the fingerboard was sanded with 200 grit paper and a radisu block to remove all of the excess filler and then blown off with high pressure filtered air.

this revealed that there were still a few minuscule pores still needing some filling - practically none compared to the first round, eh?

once this last round of filling has cured, I'll sand this with 200 grit paper and a sanding block and then load this back into the neck support jig for a detailed fingerboard leveling. at this point the fingerboard will be ready for application of its first coat of epoxy ... finally several months of testing methods for epoxying a very porus Rosewood fingerboard is starting to pay dividends! 8-)

all the best,

R

_________________
Moderator: Blueprinting and Bondo
Pickups: Honey Badger Pickups - Like Honey Badger Pickups on Facebook!
Basses: Regenerate Guitar Works - Like Regenerate Guitar Works on Facebook!


Top
 Profile  
Reply with quote  
Display posts from previous:  Sort by  
Post new topic Reply to topic  [ 4 posts ] 


Who is online

Users browsing this forum: No registered users and 21 guests


You cannot post new topics in this forum
You cannot reply to topics in this forum
You cannot edit your posts in this forum
You cannot delete your posts in this forum
You cannot post attachments in this forum

Search for:
Jump to:  
Powered by phpBB © 2000, 2002, 2005, 2007 phpBB Group  
Design By Poker Bandits